 Professor Putricide is starting to be a fun fight for me. The first few times we were in there, even as late as last week, I felt kind of like I was running around like a chicken with its head cut off. After looking at it longer, I was doing a lot of unnecessary kiting of Putricide on phase 1, and phase 3…. well, we haven’t gotten seriously into phase 3 yet, so we’ll let it slide for now.
However, on phase 2, I finally perfected a little dance that I do with the professor that seems to keep things in line. I’ll even throw in some MS Paint directions for you on how we do phases 1 and 2. This does operate on an assumption that may be fairly big: that you get the professor to phase 2 during or shortly after the first Gas Cloud (orange add) spawns. (At one point, we got him to phase 2 almost before it spawned…) If this is not the case - if the Volatile Ooze (green add) was the most recent spawn - then flip all the directions. None of this is perfect, but if your tanks are flailing their arms wildly during the Putricide fight, maybe this will help give them a place to start, then you can adjust it to fit your raid’s needs.
As always, click to embiggen.
Phase 0: Understand the Layout
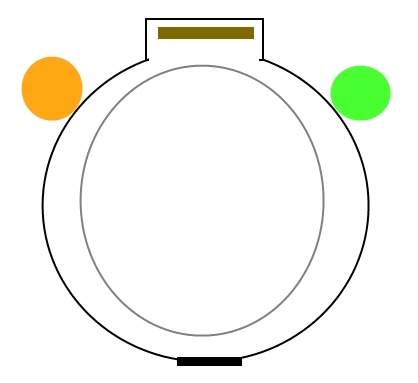
The black square at the bottom is the entrance. The gray circle is the circle that is on the floor of Putricide’s room - it actually has four little spike-like “corners” near each of the ooze nozzles, and two more closer to the entrance of the room. The brown rectangle is Putricide’s table; when you enter the room, he’s just south of it. The orange circle and green circle represent the ooze nozzles.
Phase 1: The Pull, and the Easy Part
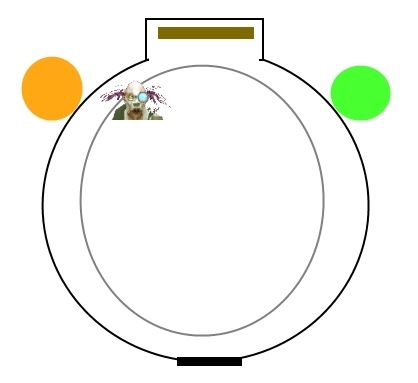
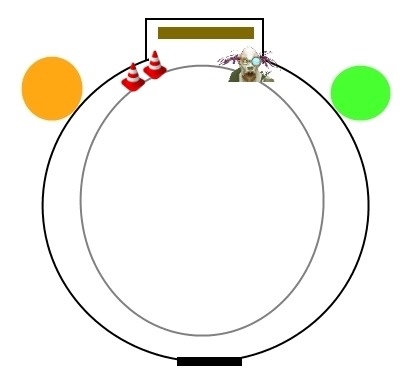
Putricide isn’t really dropping anything besides neon green ooze puddles on the floor that your off-tank, in the abomination, will be eating. If you can do so without dragging him too far away from the top part of the room (where he’ll be for most of phase 2), do so. Have your DPS control themselves, and between 83% and 85% (depending on how many dots people have up, how quickly people respond to directions, etc.) have DPS stop on Putricide, burn down any adds that are up, and let the abomination eat ooze puddles that are on the floor. There should be plenty of time to do these things if people are on the ball. During the pull, we have our off-tank charge in to the table, then I pull Putricide off of him, leading to an initial pull where he’s right here:
Then during or after the period where the DPS is burning down the green slime, I’ll typically either try to hold him by a slime pool, or move him to here, which is often roughly the same thing:
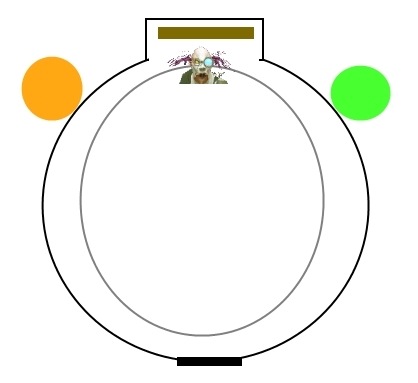
I usually hold him here for the rest of phase 1; an orange Gas Cloud will spawn, and your raid should burn it down before continuing into phase 2 - this starts at 80%. Let the abom mop up spare puddles, let the DPS burn down the Gas Cloud, then burn the professor into phase 2.
Phase 2: The Putricide Tango in Earnest
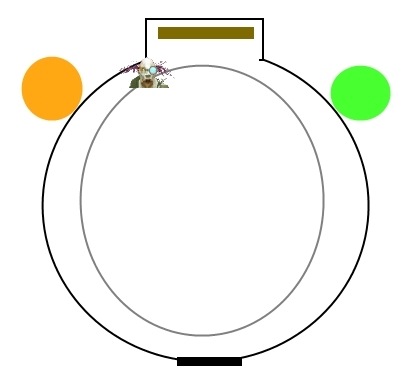
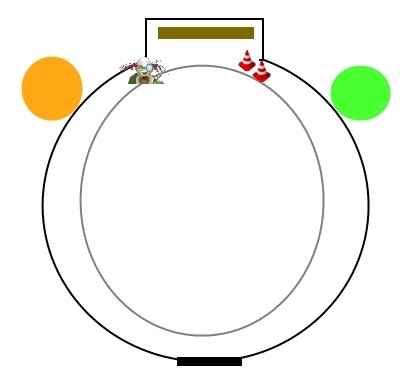
This is where the fun part starts. This is also where I used to run around like a kid high on Pixy Stix, leading to me running out of range for heals sometimes or leaving Choking Gas Clouds in weird spots for the DPS to maneuver around, which is just all kinds of nastiness. This works much better. Step 1 is to pull him near the orange slime container, as close to the alcove where the tables are as possible. Trust me, it makes sense.
Putricide will do these three abilities, and in my experience they always come in approximately the same order: Malleable Goo (very easy to avoid if your DPS is on the ball), then Unstable Experiment, then Choking Gas Flasks. Sometimes the last two get swapped, but they’re always very close together, and they’re your signal to move! Think of them as traffic cones telling you to get the hell out of the way. They are not, in any way, snow cones. Drag Putricide to the opposite side of his alcove, again, as near to the corner as you can manage.
During this time, a green slime will have spawned due to Unstable Experiment, and your DPS will have burned it down and will be back on the Professor. He’ll once again use Malleable Goo, Unstable Experiment, and Choking Gas Flasks, and the original set of gas flasks will have gone away. Once he tosses down the new one (and the orange slime is probably chasing someone), here’s what you do (I bet you’ll never see this coming):
Stunning, I know. However, essentially, you’ll be alternating between those last two dance steps for most of the fight. It’s not a very complex tango. Po sitioning adjustments will have to be made, of course, if Putricide drops a slime puddle right where you expect to be standing, but most of the time, it won’t be an issue. Enjoy your dance time with the Professor - tanking it is honestly a pretty effortless job, other than paying some attention to what’s going on - and watch his health very carefully.
Stop before 35% (I’d say 38% to 40% is safe, assuming you’re not bumping up against the enrage timer), eat all the slime pools, and burn down any adds that are up, then knock Professor Putricide down to 35%.
Phase 3: ???
I told you we haven’t finished this one yet. I have a pretty good idea of how to do it, though. Truthfully, we need to make that phase transition a little more masterfully - I wasn’t watching Professor Putricide’s health as closely as I should have, and so my warning for the phase transition as a Gas Cloud was spawning went something like this: “sh*t, he’s at 36%, stop and burn that–oh, well, never mind.” Then the orange cloud zoomed around at full speed and smacked us all in the face.
Phase 4: Profit!
Collect yer phat lewtz.