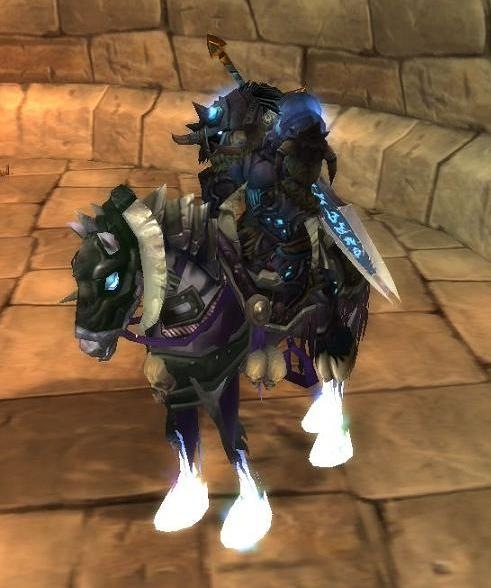
This is the Acherus Deathcharger. Many of you are no doubt familiar with it by now; this is the devil-horned horse that all Death Knights come out of their starting area with, even if it did start as a mere colt when you stole it. There’s a lot to like about the Acherus Deathcharger: it’s pretty cool-looking, it’s a summon rather than a simple mount so it has its own special summoning animation, and it’s a class-exclusive.
It also has a big downside, especially for anyone who plays with the sound on: it screams. Every time you summon it, there’s a hideous otherworldly scream that pierces the soul. It also doesn’t really play nice with capes; due to its high back, Zulfon’s cape pierces its hips and hangs out just above the horse’s tail. Ouch.
So for the past few days, I’ve been taking Zulfon into Stratholme (the old one, not the new one… or the present one, not the one in the past, either way you want to look at it – 6 times, if her Armory statistics are to be believed) to try and farm me up a replacement: the original Deathcharger.
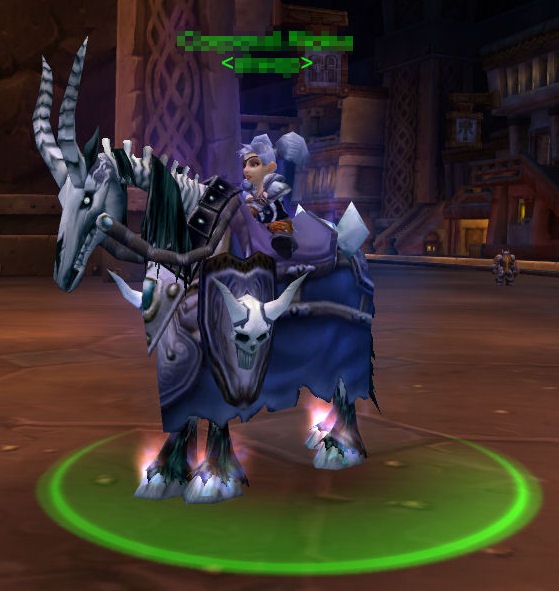
Rivendare’s Deathcharger. Now up to a 1 in 100 chance of dropping!
This blue skeletal beauty, at first glance, doesn’t look too different from a standard skeletal horse that you could buy from the undead mount vendor – however, for the Alliance, it’s pretty obvious why it’d be of interest (it’s the only skeletal horse model available to them), while for the Horde, it’s more of a sign of status. It’s got a unique color, and its hooves have a different glow than most of the skeletal horses.
Oh, and it doesn’t scream.
So do you want to get one of these for your own? This post’s aimed at Wrath babies or TBC babies, who may have never been into Strat (I fall into this group, until I started going on my own…), or those who just never got to go at all. It’s also aimed at Death Knights, since the rest of you know your own class well enough to go get your own dead horsey! You may still find some relevant info on bosses and whatnot, but you’ll have to do your own figuring on what skills to use.
A Few Things You Should Know
1. If you’re relying on Blood Presence or Blood Aura to supply you passive heals like it has as you leveled, remember that it will not work in Stratholme. Everything here is grey to you, and as I discovered while running it myself, those two abilities require you to get experience or honor from the target for the passive heals to kick in. You’re going to be relying entirely on active heals where you’ve got them – pretty much Death Strike, Death Pact, Rune of the Fallen Crusader, and Bloodworms. (Or, if you’re Frost, popping Lichborne then hitting yourself with Death Coil. Did you know that’d work?)
2. You will be using Frost Presence most of the time you’re in here. You’ll be taking a lot of hits from a lot of enemies, especially if you need to do Live Side for the Key to the City, so you’ll appreciate the health and armor boosts.
3. Unholy DKs may find this easier than everyone else due to their boosted AOEs, but a word of advice: aim your Death and Decay very carefully, don’t pop Unholy Blight without a lot of room around yourself (since its animation doesn’t have much of an aura, so you may aggro stuff you ordinarily would be walking past), and don’t summon a gargoyle unless you’re prepared for him to possibly aggro additional things. You’ve been warned.
4. Bring bandages and/or potions. Preferably both. I popped an average of 1 potion per run for a while. (Now I’m down to 0, but I still have to bandage sometimes after a particularly heinous face-aggro chain pull.)
5. If you intend to use your ghoul to explode for Death Pact, or you’re an Unholy-spec who depends on having your ghoul alive, bring Corpse Dust. The only humanoids on the entire Undead Side do not, for the purposes of Raise Dead, count as humanoids. Don’t ask me why – just bring the Corpse Dust. You may be able to get a zombie out of the Crusaders, but seeing as how you’ll have to explode/dismiss your zombie shortly into the Undead Side (see below), you’ll probably not want to make that run over to the Scarlet Cathedral.
6. If you intend to get the Stratholme achievement, you’ll want to make sure that you run at least Scarlet Monastery’s Library wing and get the Scarlet Key first. There’s no way to get it inside Strat, and Balnazzar is inaccessible until you go get it. Alternately, if you’re a rogue with lockpicking 275, an engineer with seaforium charges at least as powerful as Powerful Seaforium Charges, or a blacksmith with a skeleton key at least as powerful as Arcanite Skeleton Keys, you should be able to get your way into the Scarlet Cathedral to do all of live side. However, that is beyond the scope of this guide.
7. If you want Argent Dawn reputation, don’t forget to bring your Argent Dawn Commission. Even if you’re not specifically after the rep, I also highly recommend completing The Flesh Does Not Lie on your first run, then doing The Active Agent before resetting the instance, so as to get your Seal of the Dawn – it lets you collect Scourgestones, and also gives you a passive AP boost on par with that of some Wrath trinkets. (Spellcasters, of course, will want to take Rune of the Dawn instead.) You’ll get 5 Corruptor’s Scourgestones per run (6 if you kill Barthilas, 7 if you kill Hearthsinger Forresten), as well as 20-30 Invader’s Scourgestones, so you can get some pretty good rep from these runs.
Step 1: Stratholme, Live Side – Get the Key to the City!
If you’ve already got the Key to the City, skip down to step 2. Otherwise, you’ll need to do this part. You’ll first need to head to the Eastern Plaguelands. I assume you know where the Eastern Plaguelands are, since that’s where you come out of Acherus at. You won’t be quite ready to take on Stratholme at 58; I suggest you come back starting at 70-72.
(Click to see at full size – the same goes for every image in this post)
Stratholme has two entrances: the front door and the back door. Don’t get clever and assume you can die then ghost-walk through the gated back door; you can, but then you have to open a second door inside the instance. If this is your first trip to Stratholme, you’ll want to go through the front door. Once you complete step 1, you’ll be in the room that the back door enters into; if you use the back door on further trips, you can go straight into step 2 and follow from there. (Not that you’ll need to. Once you’ve run Strat’s undead side a couple times, you start to get it down pretty easily!)
You can ride right up to the door and enter – there’s no requirements for entering the front door (though, if you’ve been running heroics, you will need to turn heroic difficulty off). You’ll enter Stratholme where I’ve marked the word “Entrance” on the above map, and you’ll be following the blue line around. Unfortunately, you won’t be able to cut directly to the right at the first fork; that, too, require the Key to the City.
The first pull can be pretty intimidating: you’ll be looking straight down one of the main streets of Stratholme, into a swarming mass of undead. Eek! Don’t worry, though – the vast majority of these aren’t elites, and the ones that are elites are not-terribly-troublesome gargoyles summoned by the Eyes of Naxxramas. What you’ll want to do is pick out a Skeletal Guardian, lay down a Death and Decay, and Death Grip them. There’s usually 2 in each pull, so you’ll only get one, but that’s one spellcaster you don’t have to go get. The Guardian will come flying to you and primarily melee, along with a bunch of his friends, who you can beat up one-by-one or AOE, as your spec dictates. (They’re particularly not-fond of a Hungering Cold -> Deathchill -> Howling Blast combo, for those Frost spec among us.)
Now, you probably will take some damage from these pulls – maybe more than you’ll take in the rest of Stratholme – but the good news is, this is pretty much the hardest set of pulls in here. If you can make it through these tons of mobs beating on you, the rest is pretty easy. Yes, including the bosses.
The bad part is, you’re probably going to get diseased. Specifically, by Mangled Cadavers. As a class with no ability to remove diseases, if you’re not carrying an item to do so, Cadaver Worms is going to be a bitch. It deals 150 damage every 10 seconds (which, for those of you playing along at home, is enough time to apply an entire bandage if you time it right), but the downside is that your natural health regeneration is reduced by 100%. No natural health regen. At all. Food, bandages, potions, and Death Strikes – that’s it.
Me? I just suffered through it. You may want to bring some Restorative Potions, Medicinal Drake Essences, or Jungle Remedies if you aren’t a class with a way to remove diseases from yourself.
Anyway. Once you get past the first two or three pulls, you should have cleared yourself a big path down the middle of the street. Take it, veer left at the fork, and follow the road around to the right. You should see a little square area with two open gates (like a gatehouse, I guess) directly in front of you. Press your hotbar button for Death and Decay (but don’t cast it yet), run in, wait for the gates to shut, then cast it. You’ll immediately be besieged by a ton of Plagued … Rats, I think? But Death and Decay alone will kill most of them, and you’ll can smack down the rest. If you have a Ghoul on defensive, he’ll help here too. When they’re dead, there’s a couple seconds’ pause, then the gate opens up. Continue north.
Now you’ll come to a fork. If you wish to do Live Side’s Scarlet Cathedral, veer to the west. You’ll find an open area with a bunch of Scarlets hiding behind boxes; you’ll know this is the right place. When you finish, return to this spot in the guide, and go right at the fork instead of left.
You may pass Hearthsinger Forresten as you go; if you’d like to have a shot at the best trinket ever, feel free to take him down. He has no adds, no special abilities, no fears, no really tough attacks – basically, he’s cake. He’s also non-aggressive, so you can take him on at your whim.
Continue eastwards, taking out enemies that get in your way. You’ll find an ‘underpass’-like area, in which you’ll be attacked by an aggressive (and previously-invisible) phantom and his criminally easy adds; lay down a DnD, wail on the main phantom, and continue on your way. When you get to Festival Lane, head around the outside edge to the eastern gate and head through to Elders’ Square. Now you’ll see the first (and technically only) boss on Live Side that you have to kill: a wight, Magistrate Barthilas.
Boss Fight: Magistrate Barthilas
He’s pretty easy. Wait until he’s out of his crowd of undead groupies, then Death Grip him to you. Make sure your back is to a wall. He has a spell interrupt (that won’t matter to us DKs), a pitiful drain, a barely-worth-mentioning enrage, and knockback. You’ll take him down in probably 30-45 seconds, at which point you rob him of the Key to the City. Congratulations! You’ve just completed all you have to of Live Side in order to go on to Baron. In fact, if you went ahead and did the Scarlet Cathedral, you’ve completed all of Live Side – period! Plus you can now skip all that nonsense next time you come back, and go straight to…
Step 2: Stratholme, Undead Side – The Baron Meets His Maker
Or is that the other way around? Anyhow, here’s a map.
For those of you joining us from above, I’ve marked the service entrance for you, but if you’re continuing from step 1, you’re in Elders’ Square and will also want to follow the green line. This’ll be fun!
Head to the north side of Elders’ Square and open the gate. As soon as you do, Baron Rivendare will taunt you and cast a debuff on you, The Baron’s Ultimatum.
Baron Rivendare yells: Intruders! More pawns of the Argent Dawn, no doubt. I already count one of their number among my prisoners. Withdraw from my domain before she is executed!
It doesn’t have any negative effects; it just lets you know how long you have until Baron Rivendare kills Ysida Harmon (also known as the 45-minute Baron run). If you’re doing this at the level I recommended it, you should be able to get it done in about 20-25 minutes, earning yourself an extra 300 Argent Dawn reputation, if nothing else – and that’s with several trash pulls.
It’s not super-clear from the path above, but once you go through the first gate you’ll want to turn left. Avoid trash where you can (you can get reasonably close to things without aggroing them), but if you do run into them, kill them. It won’t be hard. Soon enough you’ll get to spot #1 (marked with a 1 above, squished between a loop of the green line). Clear all the trash in the plaza below the ziggurat (yes, all of it, just in case), and get ready for a boss fight.
Boss Fight: Nerub’enkan
There’s simply no other way to put it: Nerub’enkan is a bitch to fight as a Death Knight. Honestly, she’s the hardest boss in here, and not even because she herself is hard so much as she has a habit of running out of melee range. You’ve got a few seconds to fight her at the beginning of the fight, so lay the smack down on her with your normal rotation. When she runs out of range, you may want to look into summoning your gargoyle or rune weapon. You can still hit her with Icy Touch, Howling Blast, and Death Coil; if you’ve got a ghoul out, the ghoul will follow her around hitting her as she runs in and out of range, and periodically Nerub’enkan will web your ghoul instead of you, letting you get a few more hits in. Even non-Unholy DKs may want to summon a ghoul just for this fight.
The main reason to clear all the trash is because Nerub’enkan likes to scamper around during this fight. The range at which she can get the necromancers and crypt fiends to add seems enormous, so I wouldn’t recommend letting anyone live. If you can catch the Rockwing Gargoyles that speed up and down the gauntlet and kill them too, so much the better. (It makes your life easy later on as well.)
It’ll take a little bit due to her in-and-out-of-range dance, but eventually you’ll down her. Collect your loot (including a Scourgestone if you have one of the commission trinkets equipped), go into the ziggurat and kill all the cultists therein (5 non-elite humanoids who do not count as humanoids for the purposes of raising a ghoul), and you should see one of the Ash’ari crystals vanish with a bright light. 1 down, 2 to go!
If you’re doing The Active Agent, don’t forget to look for the box in here. I’ve never found it in here, but your mileage may vary.
Exit the ziggurat, head back towards the entrance of the Undead Side, only this time head east towards the spot marked 2 on the map above. You should be able to just squeeze between each crowd of trash – generally I have to clear no trash at all coming through here – and you won’t need to clear any trash at all at the base of the ziggurat, because it’s time for a boss fight with no adds.
READ ME NOW: Get rid of your ghoul. I don’t care if you explode it, dismiss it, whatever. If you’re a hunter reading this, get rid of your pet; if you’re a warlock, dismiss your demon; if you’re a mage or shaman, don’t summon an elemental. If you’re any class, don’t bring friends. But to death knights: get rid of your ghoul. You won’t need it anyway.
Boss Fight: Baroness Anastari
Just hit her until she stops moving.
I’m serious, that’s all there is to it.
Okay, fine, you want actual words? She does a repeated spammable shadow attack called Banshee Scream that, odds are, will miss you 99% of the time. She doesn’t melee even if you’re in melee range. She can’t be silenced. Oh, and if you have any other party members at all, including a pet, she’ll mind control them via possession. To avoid the mind control, don’t bring anyone with you at all. If you don’t listen and you do have a friend with you, beat them mercilessly until Anastari pops out again.
She’s a joke. Kill her, take her stuff, go into her ziggurat, and kill the cultists to bring down a second Ash’ari crystal. Supposedly the box for The Active Agent can be found in here too, but, again, I’ve never found it. Your mileage may vary. Feel free to resummon your ghoul if you’re using one, but again, remember that you’ll need Corpse Dust – these cultists don’t count as humanoid. (In fact, even though the game says they’re humanoids, they have a chance to give you an Invaders Scourgestone when killed. Go figure.)
When you’re done, exit, and when exiting bear right, heading towards ziggurat #3. You should be able to squeeze between the necromancer group and the zombie group, leap over a box, kill the infected thingies that pop out of the openable box with simple melee, and run down the hallway. If you space it right, you can then run between the three groups of zombies, hit the wall to your right to avoid the banshee, and go between her and the group of necromancers that are now on your right to get to the base of Maleki’s ziggurat. If you did this, you’re golden. Death Grip one of the necromancers down to you, kill all of them and their skeletons, and get ready to fight an only-marginally-more-interesting boss.
Boss Fight: Maleki the Pallid
Man, this guy needs to get out more.
Maleki, like Anastari, is a spellcaster; he also can’t be silenced. He pretty much relies on Frostbolt. He can supposedly can Drain Life or Drain Mana, but Drain Mana’s no threat to DKs, and Drain Life – well, I’ve never seen him cast it. He also has a 10 second stun – Ice Tomb – but I’ve only seen him cast it once, and generally he scurries to just out of melee range and starts Frostbolting again. You’ll probably kill him before he gets to that point, though.
You know the drill: kill, loot, go inside, kill the cultists. This time, you’ll hear an additional shout that the Slaughterhouse is now vulnerable. Oh yeah, and if you’re running The Active Agent, this is the last location you can find the little box – and honestly? This is the only place I’ve ever seen it appear. Heck, it pops here even now that I’m not on that quest.
Woohoo! You have two choices at this point.
1. You can take the long way around to Nerub’enkan’s ziggurat and continue around. While it’s much easier to get through the trash prior to Baron this way, you’ll have to go through one of the gated ‘trap’ rooms (with a bunch of plagued insects this time) and you have to go through the whole gauntlet to get there. Or,
2. You can come out of Maleki’s ziggurat and continue to bear right, dodging trash, probably killing 1 or 2 groups, and continuing to follow the right wall until you see a large gate. (If you see a small gate, you’re facing Nerub’enkan’s ziggurat again. Turn to your right slightly.)
Either way, once you start heading the correct way, you’ll get to Slaughter Square. (Fun note: if you came through the service entrance, Magistrate Barthilas will be standing here instead of Elders’ Square – he galumphs off to warn the Baron about intruders, which to him apparently means chilling in an alleyway. Kill him if you want, he’s no harder, and he’s a free Corruptor’s Scourgestone.) Now you get to enter Slaughter Square, which truly lives up to its name.
Event: The Abominations in Slaughter Square
PLEASE READ THIS BEFORE YOU START KILLING THE ABOMINATIONS. I cannot emphasize this enough. If you do not do what I say, or something like it, you will get yourself stuck in such a way that you cannot advance further in Stratholme, and you cannot leave either (without a hearthstone, teleport, etc.). You’ve been warned.
When you enter Slaughter Square, you’ll see a bunch of abominations of two kinds milling around – Bile Spewers, who are kind of annoying but also easy, and Venom Belchers, who are really easy. DO NOT START KILLING ALL OF THEM. My advice is to get just a few yards out from the inner gate of Slaughter Square (so that if someone tried to leave you’d be directly in the way), pick one near the center, and Death Grip it towards you. Kill it quickly, then wait. Venom Belchers have an interruptable nature-dealing poison and an uninterruptable instant-cast movement-slowing poison. Bile Spewers will spawn 1 slime during the fight and several when they die; a Death and Decay will take care of these.
Now, what should happen is that after a few seconds go by (long enough for, say, a level 60 party to at least get partially rested), you’ll see a second abomination break from his mindless milling about and head towards you (or, more specifically, the gate). Wait for him – don’t pull him, don’t do anything, just wait for him to get close, and then he’ll aggro you (well outside of his normal aggro radius, incidentally). Kill him. Keep doing this. If you see one start going towards the gate while you’re killing another one, grab it – Death Grip, Icy Touch, even just siccing your pet on it, but do something. I can’t emphasize this enough:
DO NOT, UNDER ANY CIRCUMSTANCES, ALLOW AN ABOMINATION TO REACH THE OUTER GATE OF SLAUGHTER SQUARE.
Odds are this will bug your event. While you’re fighting other abominations, you’ll always want to keep the camera turned towards the gate if you can. Once you’ve gotten it down to 4 or 5 abominations left in all, you may see them stop coming towards you. That’s fine – kill all of one side, then all of the other. Try to save a Venom Belcher for last. Pull it directly in front of the (closed) door to the Slaughterhouse, and kill it. If you’ve done everything correctly, you should see:
Baron Rivendare yells: So you see fit to toy with the Lich King’s creations? Ramstein, be sure to give the intruders a proper greeting.
If you don’t, it’s probably bugged. Your only choice is to Death Gate or Hearthstone out and reset the instance. GMs can supposedly trigger Ramstein, but I haven’t been able to ever get a GM in less than 30 minutes. Just go on and reset and try again, and this time, do what I tell you.
If you do, sprint for the door of the Slaughterhouse. If it’s still closed, run against it. When it opens, run through Ramstein (aggroing him on the way), and head left or right down the short stairs until you’re in front of the Baron’s doors. Fight him here.
Boss Fight: Ramstein the Gorger
Probably the most difficult part of fighting Ramstein the Gorger is that he hits like a truck. He’s got a knockback/stun combo that kind of sucks, but since you’re down here, he won’t hit you too far. The downside is that he can still reach you to hit you; the upside is that you don’t have to run back to him to hit him. Make sure you’re standing in front of the Baron’s doors when Ramstein falls. Heal up; the next part won’t start until you start it.
Optional Event: 300 Angry Undead Spartans
If you didn’t make it inside before killing Ramstein, it’s not that big of a deal – you’ll just have to take on a swarm of undead. And I do mean a swarm. A lot of weak zombies and skeletons are going to come piling out of the southern gate of Slaughter Square, and will aggro you pretty much as soon as you enter. If you’re already inside the Slaughterhouse, like I told you, this won’t matter. If you’re not, then just wait and pile on as much AOE as you can. Death and Decay, HC + DC + HB, Unholy Blight, Pestilence + Blood Boil, use anything you’ve got and pray they don’t kill you. Then heal up. You’ve got time, but unlike when you fight Ramstein indoors, this event will start with or without you; if you need to heal a lot of health, make sure you’re well away from the doors of the Slaughterhouse.
Mini-boss: The Black Guard
For some reason, the Baron’s last-ditch effort to stop you is a pack of angry skeletons. If you’re standing in front of the Baron’s door, you’ll find them standing up by the front door of the Slaughterhouse; if you were outside and had to fight the undead swarm, they’ll come outside to you. I haven’t noticed any abilities on these guys whatsoever other than that they hit pretty hard. DnD, the usual AOE, burn ‘em down. When they’re done, it’s time to fight Baron. He’ll wait, don’t worry. Heal up, get ready to go in and pummel him down.
Final Boss: Baron Rivendare
Baron Rivendare yells: Time to take matters into my own hands. Come. Enter my domain and challenge the might of the Scourge!
Rivendare will sit at the far side of his room until you engage him. He’s got an unholy aura that will begin ticking as soon as you enter, but in my experience, this aura misses. How you miss with an AOE the size of your room is beyond me, but I digress.
Rivendare will melee you. Periodically he’ll cast shadow bolts. He’ll also emote about summoning dead servants back to life; lay down a DnD and it should take care of these guys and deal damage to the Baron at the same time. You want these guys to die, because a short time after they’re summoned he’ll cast Death Pact on any of the living ones, giving him back some health for each one still alive.
And… that’s it. He doesn’t move, he doesn’t hit particularly hard; he just casts shadow bolts, melees you, has that aura, and can heal himself… sometimes. AOE for the skeletons, and pummel Rivendare with everything you’ve got. This is a great time to use Summon Gargoyle or Dancing Rune Weapon if you’ve got it. Basically just beat him down, and when he’s done, knock over the skeletons (they take about 1-2 hits from a ghoul, it seems; they’re not too strong). Loot the body… and pray for pwny!
Thanks for the guide, Stop! I won’t be doing it as a DK, but I learnt a few things for running it on my paladin – for instance, I didn’t know you could avoid the 300 Angry Skeletons and the Black Guard by running inside to fight Ramstein.
Now I just have to decide if I want to run it as ret or holy.
Sihas last blog post..Link Round-Up
@Siha: From what I understand, paladins of all stripes tear apart Stratholme. You just need to be careful with Consecration, since you can’t place it so much as it places itself. However, just about everything (including every boss!) is undead, and I’m thinking between just Holy Shock, Holy Wrath, and Exorcism a healadin would do just fine.
Humanoid or not, the reason you still need Corpse Dust to make a new friend in hear is the same reason the Blood Presence/Aura doesn’t heal- the mobs were too low level for you. So it does not matter whether they were humanoid or not.
Should I be able to do this as a lvl 70 or better to wait till 72? Unholy spec with the rest in Frost.
I have run this a few times on my pally. LVL 80 and prot spec. It takes me about 15 minutes or so from the servant’s entrance to killing the Baron. If you are careful, you can run past 95% of the mobs. The only mobs I really worry about are the patrolling gargoyles which can be a pain in the butt, and all the mobs in front of Nerub’enkan. I’ll be trying this as soon as I can on my DK (only lvl 60 at the moment) as I want the origional DK mount, and I’m tired of the banshee-like scream my horse makes.
Nice guide, and I’ll keep this in mind. I can manage this ridiculously well on my priest (even as shadow, a baron run takes 20 minutes, tops). Good to know how to do it for my DK!